How to Play
This page aims to guide new players through the mechanics and functions of the game, though it can be referred to later on during the game.
This guide was last updated on the 23rd of September 2026.
Getting Started
-
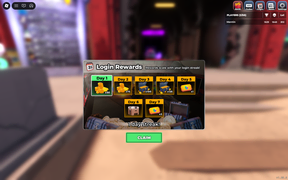 Login Rewards
 -
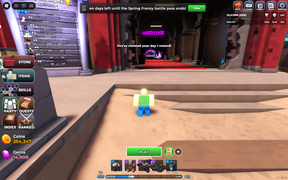 Starting UIs


Upon joining the game you will be greeted with an interface showing various custom UIs, as well as the familiar Roblox GUIs such as the chat. You will initially receive the Login Rewards for the day, which you can claim every day whenever you play the game. The custom UIs have various functions.
| UI Icon | Popup UI | Name | Function |
|---|---|---|---|
 |
       |
Store | This is the place to buy Towers, Emotes, Crates, Nametags, Gamepasses and Developer Products.
Under Home, you check in-game advertisements, of Gamepasses, Crates or Towers. Under Towers, you are sent to the inventory. Under Skins, you can buy Crates or a specific skin for sale, that can be used for your towers. Three random skins and four crates can be bought there, which change every day. Under Emotes, is where you buy new emotes to your inventory. Four emotes can be bought there, with the emotes changing every day. Under Tags, you can buy Nametags. Eight random nametags, two for each rarity can be bought here, which change every day. Under Gamepasses, you can buy various gamepasses and towers, such as DJ Booth Custom Music Gamepass or the Crook Boss tower. for Under Credits, you buy Under tickets, you can buy various tickets, such as |
 |
       |
Items | This is the place where you equip your Towers, Emotes, Nametags, Charms, select skins for towers, and open Crates. You can also purchase crates and towers here.
To select Towers for your loadout, you need to have free slots available on your Tower Loadout. You then choose Towers you want to equip and then select Equip. In the Crates section, you can purchase any crate that is currently on sale. You can open these crate by clicking Open. In the Items section, you can equip your consumables by clicking a consumable and clicking Equip. Up to four consumables can be equipped. In the Cosmetics section, you can pick an emote, charm, nametag or title that you want to use. You do it by choosing a cosmetic and clicking Equip. |
 |
 |
Skills | This is where Skills can be seen. These are small boosts which are applied to either towers, units, base health or cash gained. They are unlocked once the player reaches Level 15.
It is split into four categories: Defense, Offense, Strategy and Economy. If the player wishes to change what Skills they spent their currency on, they can reset the Skills. This will give back 95% of the spent currency in the form of |
 |
  |
Quests | This is the place to start, cancel and collect rewards for completing Quests and Mission Quests. In the Quests tab, there are four daily quests, which reset every 24 hours and two weekly quests, which reset every seven days. The timer for quests getting reset does not start until you join the game. Cancelling a quest resets progress for it. Only two daily quests and one weekly quest can be active at the same time.
In the Mission tab, all Mission Quests are visible and can be accepted as long as the player meets the requirements, which is generally just owning the tower it gives a skin for. Only one of the Mission Quests can be activated at once. During events, an additional tab may be added which includes limited time quests which include rewards, which can vary from permanent items like the Premium Crate and limited time items like Krampus Slayer Cryomancer. Daily and Weekly Quests can be refilled using |
 |
   |
Index | This is the place where you can check the statistics of enemies you have unlocked.
To view an enemy, you must collect a Logbook that they can randomly drop. This has a low chance of dropping. Once you have selected an enemy, you can view their statistics, such as their speed and health. You can also view the description of an enemy, if it has one. You can also view maps after completing it on any mode. This will show the amount of times you have won and lost at the said map, your win to lose ratio, and how far you have gotten in every mode that the map is playable on. The achievements can also be seen here. These are tasks which when completed, reward you with one time rewards. |
 |
    |
Settings | This is the place where you configure your game to your liking. You can also access this GUI during a match.
Under Gameplay, you can alter various settings which affect the gameplay. These include auto skip, disabling dialogue or changing the size of the player's avatar. Under Graphics, you can turn on or off multiple graphical settings, such as HQ explosions, shadows, bullet trails or change the size of the game interface. Under Sound, you can change the volume of various sounds, such as music, emotes and towers. Under Keybinds, you can change keybinds or reset them to default settings. This menu is not available on mobile or consoles. |
 |
        |
Party | This is where you can create or join parties.
Under Party, you can see your party and people you can invite. If you are not in a party, a party list is displayed instead. To create a party, click Create Party. It is possible to change the settings of a party. There are four options. Party lock is turned on by default, disabling it allows uninvited people to join the party. Members can invite allows other party members to invite people, this is turned off by default. The two other settings are Level requirements, by default it is set to Level 0-1000. You can also be invited to parties. When you are invited, you will receive a message on the bottom of your screen telling you that a player has invited you to their party. You can join their party by pressing the Accept button on the message or under Invites. You can also press the Deny button there to decline an invite. When the party owner starts a match, multiple interfaces will appear, that display player that was in their party, their loadouts, victories, triumphs and losses. On the top, you will see an interface that tells you if you found a game and how long you were looking for it. On the right side of it, you can also press a button which allows you to leave the Matchmaking search, as long as Matchmaking is still looking for players. |
 |
 |
Ranked | This is where you can see various information related to the PVP mode.
On the left, the player's current rank alongside their ELO will be shown. Next to the ELO, the amount left until next rank is also visible. On the right, rewards for reaching each rank and what arena it puts the player in can also be seen. |
 |
 |
Playtime Rewards | This is where you can collect Playtime Rewards.
Most of the time, six separate gift boxes will appear which give out either one or two rewards from their reward pool. For players that can see ads, an additional row of gift boxes will sometimes appear. Base rewards are unlocked after a certain amount of time passes in-game while ad rewards are given out after watching an ad. All rewards reset after a day. |
 |
 |
Codes | This is where you redeem Codes, simply enter a code in the box then click Redeem. |
 |
 |
Gift Box | This is the place where you can claim various gifts, such as towers or skins. |
 |
 |
News Feed | This is where you can see the update log for updates. It only shows updates after the end of the Solar Eclipse Event, though only most recent ones are shown first. |


| UI | Name | Function |
|---|---|---|
 |
Coin & Gem Counter | This is where you can see how much currency you have, mainly the   |
 |
Tower Loadout | There are mainly five available slots in which you can equip your towers, though some events give the player a sixth tower while some modes reduce the number of towers. The fifth slot can only be unlocked if you are Level 15+. Each slot has a number in the top left corner, which shows which key on the keyboard you have to press to place down your towers during a match. |
 |
Quest List | On the side in the lobby and during matches, a list of currently tracked Quests and Mission Quests can be seen, which also showcases the progress made, its name and requirements. All daily and weekly Quests automatically record progress, regardless of whether you have them tracked or not.
Upon completing a quest, the completion requirement text will change a message telling you to redeem the rewards in the lobby. |
 |
Play | Above player's loadout, a button that quickly allows someone to play a match can be found. Clicking it will open up a menu with various Matchmaking options. On the side of the button, current party members can also be found. |
 |
Level Bar | This is the level progress bar which displays  Currently, the formula for levelling up is
|
 |
Emote Wheel | This is the wheel that shows your emotes. To use an emote, simply click on one of them. |
 |
Sticker Wheel | This is the wheel that shows your sticker. To use an sticker, simply click on one of them. |
 |
Communication Wheel | This is the wheel that shows various communication options to coordinate strategy with players who are unable to chat normally. This feature is only available in multiplayer servers and can be toggled via a keybind (N by default) or via the hotbar. If you are in a solo server, this feature will not be available. |
PC Controls
Multiple of these controls can be changed using the Settings menu.
| Controls | Function |
|---|---|
| WASD/Arrow Keys | Walk Around |
| Space Bar | Jump |
| Left Shift | Sprint |
| Hold RMB & Drag | Pan Camera |
| LMB | Click |
| G | Open Emotes menu |
| H | Open Stickers menu |
| Left Shift | Quick place |
| Q | Cancel placement of tower |
| R | Rotate placement of tower |
| 1/2/3/4/5/6 | Picking a tower to place |
| E | Upgrade tower |
| T | Upgrade tower's bottom path |
| Q | Switch hotbar |
| X | Sell tower |
| F/B/H/J/K/L | Ability keybinds |
Console Controls
| Controls (Xbox) | Controls (PlayStation) | Function |
|---|---|---|
 |
 |
Walk around |
 |
 |
Sprint |
 |
 |
Jump |
 |
 |
Pan camera |
 |
 |
Zoom |
 |
 |
Game menu toggle |
|
|
Move in menus, though it only works in some menus, others require game menu toggle |
 |
 |
Open battle pass in lobby |
 |
 |
Open catalog in lobby |
 |
 |
Open main Matchmaking menu in lobby |
 |
 |
Open/close sticker wheel |
 |
 |
Open/close leaderboards |
 |
 |
Open/close emote wheel |
 |
 |
Select, right trigger/r2 sometimes works on some |
|
|
Close, only works on some menus |
|
|
Interact with something |
 |
 |
Swap hotbars |
|
|
Start tower placement |
|
|
Cancel placement of tower |
  |
  |
Cycle through placeable towers |
|
|
Rotate |
|
|
Place down tower |
|
|
Select placed down tower |
Mobile/Tablet UIs

Mobile and Tablet users have a similar UI to PC players, however, there are Run, Emote, Sticker, Move joystick and Jump buttons.
Starting Out
At the beginning of your time in the game, you start off with the Scout, Sniper, Garry's Dance, Flex sticker and GG. Starting players will also be greeted with the Tutorial objective, which when finished rewards the player with  Robux. Follow the instructions above to buy and equip towers.
New players also receive the Starter Bundle, which can be bought for 350. If bought, it will give the Militant,
The Lobby
You spawn in the middle of the Main Lobby, it is a beach with multiple buildings on the sides. Two Leaderboards can be found next to the main Elevators area of the Main Lobby. One showcases the highest amounts of
There are four areas to the sides of the Main Lobby. The first is a beach which has nothing of note on it. The next is a portal to the event area which is not always open. The one to the right of the event portal is the Elevators area, containing ten survival Elevators and three Hardcore Elevators—two for Hardcore mode and one for Voidcore mode. The last spot is the extra building, which contains the Challenge Trials Elevators and the PVP Matchmaking statue, the Leaderboard for PVP and the player's PVP ranking.
Gameplay

When you first enter a Survival match, you can choose the mode for the match you are about to play. You can choose Easy, Casual, Intermediate, Molten, Fallen and Frost. From left to right, the mode becomes harder as enemies with more health and special abilities appear. Overall, the defeat/triumph rewards are greater for harder modes per wave. If you enter a Survival map via Elevators, you will vote for the difficulty as you spawn in the map. If you enter Survival mode via Matchmaking, you will vote for the map using the four given maps or, if you have the VIP Gamepass, can override a map of your choosing.
If you entered a Hardcore or Voidcore match, you cannot choose the gamemode. It will always be Hardcore or Voidcore mode, respectively. If you are playing on a special mode like Polluted Wasteland II, Pizza Party or Badlands II, you cannot choose the gamemode. It will always be their own special mode.
The mode with the most votes is selected. If nobody votes, then the timer to the beginning of Wave 0 does not count down. If people vote and there is a tie, easiest mode is selected. Using the ready button under the modes skips the timer to five seconds. In Hardcore mode, special maps and events, a ready button appears instead, which when most players select that they are ready starts the match. After this, all players start with a set amount of cash, based on the mode. With it you can purchase towers and their upgrades. Joining the Paradoxum Games group also increases it by 
- In Easy, Casual, Intermediate, Molten, Fallen, Challenge Trials, Frost and Pizza Party modes, players start with

- In Hardcore and Voidcore modes, players start with
- In Badlands II, players start with
- In Polluted Wasteland II, players start with
- Event and Challenge maps have varied starting amounts of money.
You get additional money by damaging enemies yourself, if someone else damages enemies, wave rewards or economy towers like Cowboy and Farm.
At the beginning, multiple arrows will appear on the path and move through it, showing the path taken by enemies. After the starting wave, arrows indicating the path enemies take stop appearing until the next wave ends. Enemies follow the path. They do not variate and follow a set pattern, which more or less follows that found on the Waves page. The exceptions are event maps. Certain enemies have attributes and abilities. For example, Moltens cannot be burnt by Pyromancers, Hiddens cannot be attacked by towers without hidden detection and the Warden can stun towers.
-
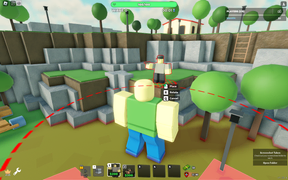 Incorrect Ground Placement
 -
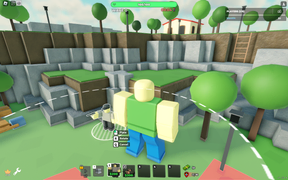 Correct Ground placement
 -
 Incorrect Cliff Placement
 -
 Correct Cliff placement


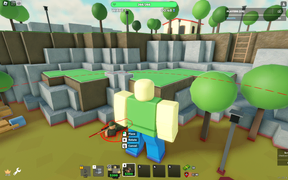
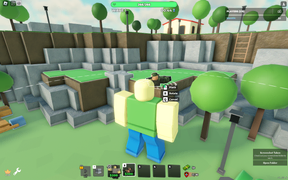
You can only place towers down if their primary range circle is white. Ground towers, such as the Scout or Soldier, can be placed on ground spots, where there are no red spots from other towers. Cliff towers, such as the Sniper or Ranger can be placed on cliff spots, where there are no red spots from other towers. You may not be able to place towers even if the range circle is white due to other towers being present or obstacles on the map. Cliff spots will become highlighted while placing down a cliff tower. The white circle of the tower indicates the range of the tower. If an enemy crosses this white circle, the tower will be able to attack the enemy, so long the enemy does not have an immunity to that tower or the enemy requires Hidden detection, Flying detection or Lead detection and your tower does not have it. Some towers, such as the Rocketeer, also have a red range circle called the deadzone range. Enemies in this range cannot be targeted by the tower. Some other towers like the Necromancer or Engineer have additional orange range circles which have varied functionality.
To place down a tower, click the tower icon you want to place down, or a specific keybind. You can use the Q key to cancel placement and the R key to rotate placement. For tablet/mobile users, you need to double tap to select and place down towers. You can place down 40 towers in a solo, 30 in a duo, 25 in a trio and 20 in a quad. Certain towers, like the Military Base, have placement limits.

The main bar is the amount of health you have. By default, it is 100, but this can be changed either using the Fortify Skill or by the map or mode having HP Locked. The image above shows the base having 200 health, assuming that Fortify is at Level 20.
The left text is the current wave. The right text is the remaining amount of time for the wave to end/wave to start. After a certain amount of time, a skip wave box appears which you can accept or decline. It requires the stated amount of votes for the vote to continue. For example, 0/2 means that 0 players have voted to skip the wave and 2 players are required to skip the wave. Skipping the wave means that you get the wave reward early but that also means that the next wave starts early, meaning that enemies can create huge hordes. Completing a wave results in the wave reward being granted to place or upgrade towers. See the Waves page for more information about timers and skip wave vote.

There may be small icons on the bottom left side of your screen while playing a match. These are modifiers, which are special attributes applied to maps and gamemodes, that can affect gameplay. Modifiers can be purely cosmetic, like for example the Cowboy modifier, which adds cowboy hats to all enemies in Badlands II. Additionally, some cosmetic modifiers are applied to all matches during holidays, such as the Fireworks modifier, which is active in all matches on the 4th of July and New Year's Day. Modifiers can also make the match harder, such as the HP Locked modifier, which when active sets the base health to 100, regardless of the player's levels.
Modifiers can also increase the amount of currency rewards, like

If you tap or click on a placed tower, you open up its upgrade box. There you can see various information about the tower. The next upgrade changes are shown, as well as the next upgrade's name, level and icon. Around the icon, icons for hidden, lead and flying detections can be seen. Under the upgrade name, a progress bar can be seen, which shows how many upgrades are left until the last level. Depending on the tower, it can have from three to six upgrades. The upgrade cost is also shown. You can click it to buy the upgrade. If the tower is on its last level, the upgrade button is greyed out.
You can sell towers to remove them, but only get the stated amount of money back. Next to the sell button, the targeting of the tower can be seen. There are seven targeting options:
- First targets the first enemy and is the default setting for all towers.
- Last targets the last enemy.
- Strongest targets the strongest enemy.
- Weakest targets the weakest enemy.
- Closest targets the closest enemy.
- Farthest targets the farthest enemy.
- Random targets a random enemy.
Under the tower's model preview, you can see the total amount of damage the tower has dealt, current Level and the total amount of

Consumables are another way to combat the enemies. Consumables like the AirStrike can be used to kill the enemies, consumables like the Flash Bang can be used to debuff enemies while consumables like the Damage Flag can be used to help the player. There is a limit on how many consumables can be used in a match and each has a cooldown when the match starts and after being used. Consumables are disabled in Hardcore mode and some Challenge Maps.
-
 Triumph Screen
 -
 You Lost Screen


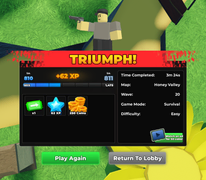
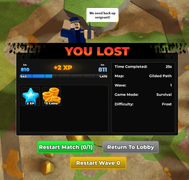
After the round ends, you are given one of two results, whether it would be a triumph or a loss. If players successfully defeat all enemies, you will receive a triumph. However, if all base health and overheal are gone, you will receive a loss. The match length, mode type and map name is shown below the result as well as the round rewards for all players. Any additional reward for beating the map (such as consumables, towers or UGC accessories) are also shown. You are given a certain amount of
After this, everyone is teleported back to the lobby.